Sunday, October 7, 2012

weekend projects

Here are some project I worked on this weekend from our Halloween packs.  :)


This cut little purse and prymid were made with our Cricut Artiste Collection.  Aren’t they cute?  The embellishments are the Moonlight compliments

IMG_1388


These cards were made with paper from the Halloween on the Go Workshop


IMG_1389

Layout from our Moonlight kit and compliments

IMG_1390


Here is a layout made with the Halloween Party Workshop on the Go.  The black rectangle and black cirles are where the pictures will go.

IMG_1391


These are my club November layouts.  This is the Clementine kit.  People think this is too “girly” a kit, so I made a layout for both a girl and boy.  These are typically “western” type paper, but I used September’s Stamp of the Month to make it a “fall” type layout.  The scarecrow is stamped with black staz on and colored with our new alcohol markers.  So what do you think?  Does the boy one look “boyish”?

IMG_1386 IMG_1387

Saturday, October 6, 2012

Advent Calendar workshop


Come and make this cute advent calendar! We will make the calendar together at the workshop. Included in your kit price:
1 – My Creations® Cubby (Z1804)
1 – My Acrylix® Advent Calendar Workshop Stamp Set
(C-size)
15 – Cardstock Sheets (3 ea. of 5 kit-exclusive colors)
1 – Bitty Sparkles (Z1263)
2 – 12" X 6" Dimensional Elements In Color—Frames Sheets
1 – Instructional Brochure

We will use my Artiste Cricut cartridge to make the blocks. You will need to provide your own adhesive.
Workshop will be Nov 4th at 1 PM at my home in Wyoming. This workshop is open to only 5 participants so RSVP early!
Cost for workshop $45
RSVP and prepay by October 19. Prepay is required to hold your spot.
Hope to see you there!
RSVP to nikkidscraftyemail@gmail.com
paypal id:nfdewitt@zoomtown.com

Blogger is acting wierd and I cannot get a picture of the advent calendar to link on here.  this link will show the product, I will put a picture of the calendar on my facebook page and keep trying to upload it here as well.
http://nikkid.ctmh.com/Retail/Product.aspx?ItemID=6870&CatalogID=1733

Tuesday, October 2, 2012

recent projects and contest!

Hey all, I am holding a contest on my facebook page till Oct 16.  I am challenging my customers to scrapbook “life” instead of an event.  Too often we get in the rut of scrapbooking holidays, birthdays and vacations and they all start to look the same!  We also need to scrapbook ourselves, and scrapbook “life”.  Anyone who posts a project on my facebook page before Oct 16 will be entered into a drawing for a $25 gift certificate.  So let’s get creating!

Scrapbooked with some friends the other night, here are some of my projects!

IMG_1377 This is a card I made with Cricut Artiste.  The cartridge cut out the card and I decorated it with paper from the Flirty Paper pack. Below is the inside.  It is a sympathy card for a coworker, and I left the middle empty to write my condolences.

IMG_1362

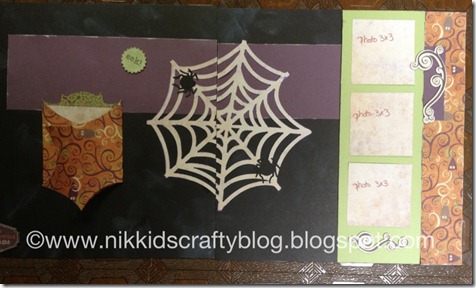
These two layouts are club layouts are made from our Moonlight kit.  The web, bat and spiders in the second layout are cut out of the Artiste cartridge. As you can see in the third picture, the bat opens up to reveal hidden journaling and a hidden picture.  The layout itself is from our new Make it from Your Heart Volume 1.  The embellishments on the top layout are the some of the Moonlight compliments chipboard pieces

IMG_1378 IMG_1379


IMG_1380


This layout was made from our Lucy paper pack from the winter Idea book.  The butterflies are made from the Cricut Art Philosophy cartridge.  The flowers are stamped from our Love Blooms stamp set.  I then colored the flowers and leaves with our new alcohol markers. I really like coloring with them, but it does take some time to get used to.  I did stamp with staz on black ink first, if you do this, let it dry fully before coloring to help keep the black from bleeding.  It still bled a tiny bit

IMG_1381


Here is a close up of two of the flowers

IMG_1371


This layout is a convention layout that I finally finished and is from our Clementine pack.  My club will be using that pack in November, so check back for more examples with that kit!

IMG_1382


This layout is made from our footloose kit from the winter idea book.  I used the Footloose compliments for the embellishments, and the layout is from Make It From the Heart, vol 1. This was the last vacation my husband and daughter were able to take with his mother before she died.  These were the only pictures they took of the whole vacation, but I felt it important to scrapbook the memory. 

IMG_1383

So.. what have you created lately?

Tuesday, September 11, 2012

September Club paper pack

We are using Avonlea this month.  Here is the club layout.  I also made one of our frames with this paper pack.  The layout is of my mom  and the frame is of my grandparents. 

The cut out for the layout is on the Art Philosophy cartridge,  the one on the left is cut at size 9.  The one on the right is cut at size 3.5. 

The paper for the frame was easy to cut out using our Art Philosophy cricut cartridge.  Its a size 11, fit to sheet. 


2012-09-11 13.30.11


IMG_1328

Thursday, September 6, 2012

Our wall of disney!

So we have been working on this project for quite a while.  I purchased the frames at Michael’s with the 40% coupons. The frames had mats already in them,which were white and black. The pictures are all pictures we took during our many Disney trips, but there are plenty to be found online if you didn’t have any of your own.  I had them all printed in black and white, during one of the times Walgreens had 40% off photos. I ended up getting the frames for about $25 each and the pictures ended up being about $15 after the discount  I’m sure there are ways to do this less expensive.  Originally I was just going to do one frame for the CA parks and one for the Florida parks but as they all have their own focal point I changed my mind.  So this project cost me about $315.  I bought a frame every couple of weeks with the 40% off coupon as I could not afford to buy them all at the same thing. The only thing I caution is to make sure its not a frame that will only be in stores for a limited time.  These were issued for graduation time, so when I needed the last two, I had to call around and find others because the stores weren’t carrying them any longer.

The 5 X 7 in the middle is the main focal point of each park.  The other pictures are pictures from around the park, not pictures of the family.  Pictures of our favorite rides, or special areas of interests in the parks. 

There are 6.  One for each of the 4 WDW parks in Florida and 2 for the parks out in California.

I got this idea when we were out in California at the Disneyland hotel.  Some of the rooms had a smaller collage of some of the focal points in the parks in black and white. I have been wanting to do it for the last year and a half since our trip out there and now that we are in the new house they are completed and hung up! I hope you like them! 

Here is the full wall

IMG_1293

Here are the two for the CA parks-Disneyland and California Adventure

IMG_1306 IMG_1301

And now the 4 WDW parks: Magic Kingdom, Epcot, Animal Kingdom and Hollywood Studios.

IMG_1303

IMG_1304


IMG_1305

IMG_1302

Monday, July 23, 2012

Teaser for the day!

This artwork isn't mine, it was made by a consultant and displayed for convention.  We have some new 3D items, one of which is this cool star!  It comes in white and can be decorated with our papers for any occasion you would like it!
This will be available on August 1.
I am also taking pre orders for the new cricut cartridge, Artiste.  If you scroll down a few days, you will see the book for the Artiste and the images/shapes you can make with it. the cute little be mine box next to the star was made with the Artiste cartridge.
If you would like to pre order or book your fall home gathering, please email me nikkidscraftyemail@gmail.com

Pin This Page!

Follow me on Pintrest!

Contact Form

Name

Email *

Message *

Join my facebook page!

10 Years!

Shop with Me!